Mục lục
Giới thiệu Layout trong Android
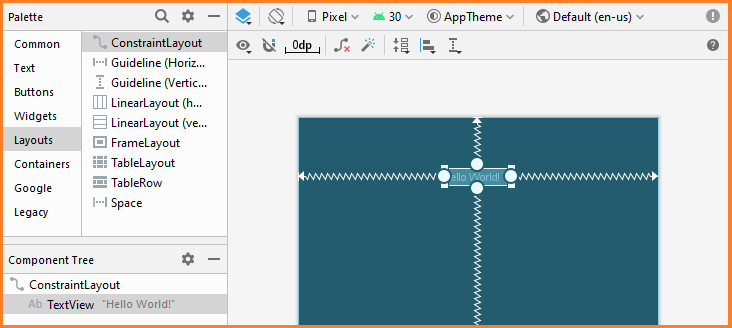
Layout là nơi để tổ chức sắp xếp Control/View trên giao diện. Các Layout này được Android Studio bố trí trong Palette/Layout:
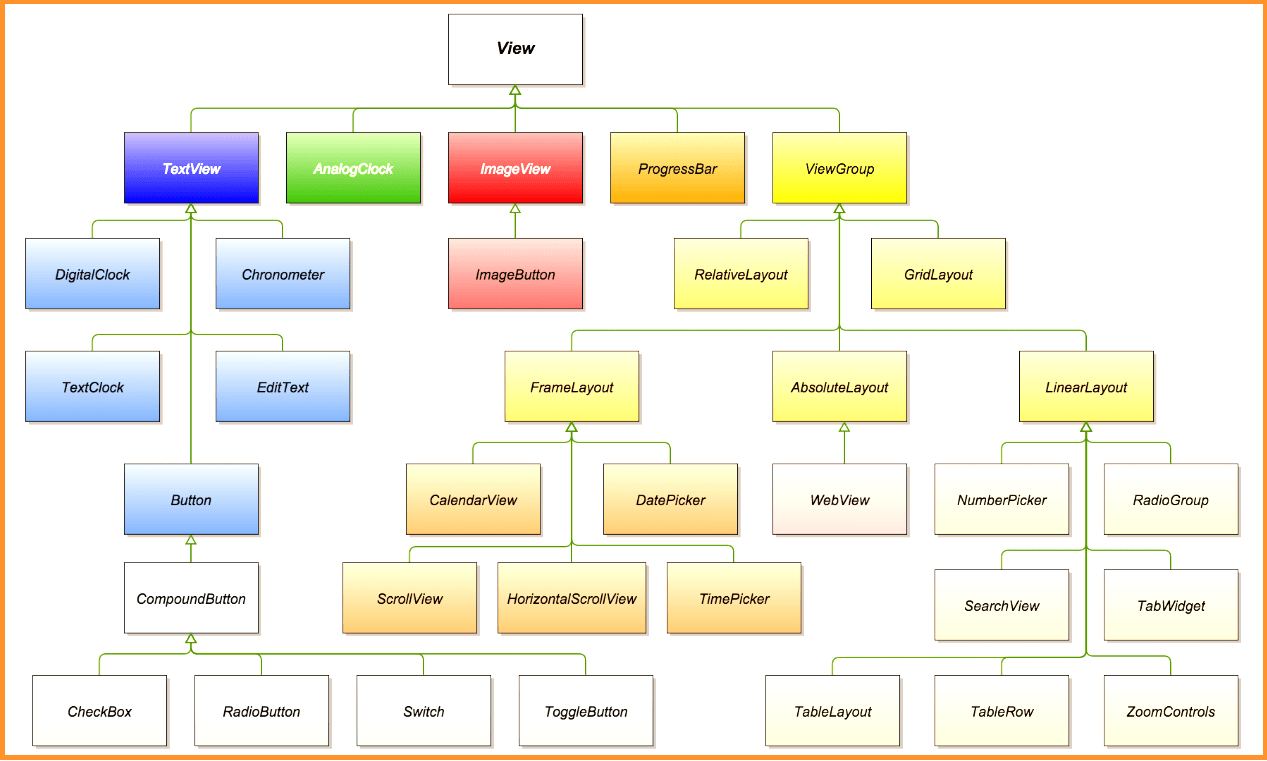
Mọi thành phần nào đó là một View (hoặc thừa kế từ View) đều có thể là con của một Layout. Tất cả các lớp Layout đều mở rộng từ lớp ViewGroup (mà kế thừa từ View). Do đó bạn cũng có thể tạo một lớp Layout tùy biến của mình, bằng cách tạo một lớp mở rộng từ ViewGroup.
Constraint Layout
Một constraint là phần mô tả làm thế nào để một view nên được định vị trên màn hình tương đối với các phần tử khác trong Layout:
Ta có thể xác định một constraint cho một hay nhiều mặt của một view bằng cách chế độ kết nối bất kỳ sau đây:
- Điểm neo nằm trên một view khác.
- Một cạnh của layout.
- Một guideline.
Android cung cấp các loại constraint sau: Relative positioning, Margins, Centering positioning, Visibility behavior, Dimension constraint, Chains. Layout này được áp dụng để thiết kế các màn hình Responsive không lệ thuộc vào độ phân giải.
Cấu trúc XML của constraint layout được mô tả như sau:
<?xml version="1.0" encoding="utf-8"?>
<androidx.constraintlayout.widget.ConstraintLayout xmlns:android="http://schemas.android.com/apk/res/android"
    xmlns:app="http://schemas.android.com/apk/res-auto"
    xmlns:tools="http://schemas.android.com/tools"
    android:id="@+id/constraintLayout"
    android:layout_width="match_parent"
    android:layout_height="match_parent"
    tools:context=".MainActivity">
</androidx.constraintlayout.widget.ConstraintLayout>
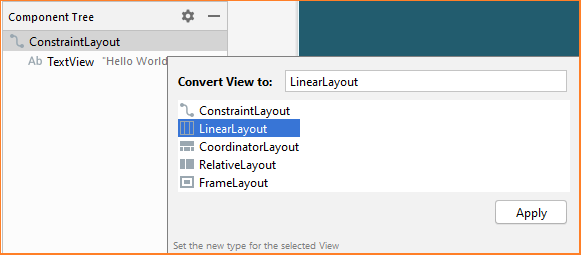
Android Studio còn cung cấp chức năng chuyển đổi từ các Layout khác qua ConstraintLayout. Bằng cách bấm chuột phải vào Layout bất kỳ/chọn Convert to ConstraintLayout:
Frame Layout
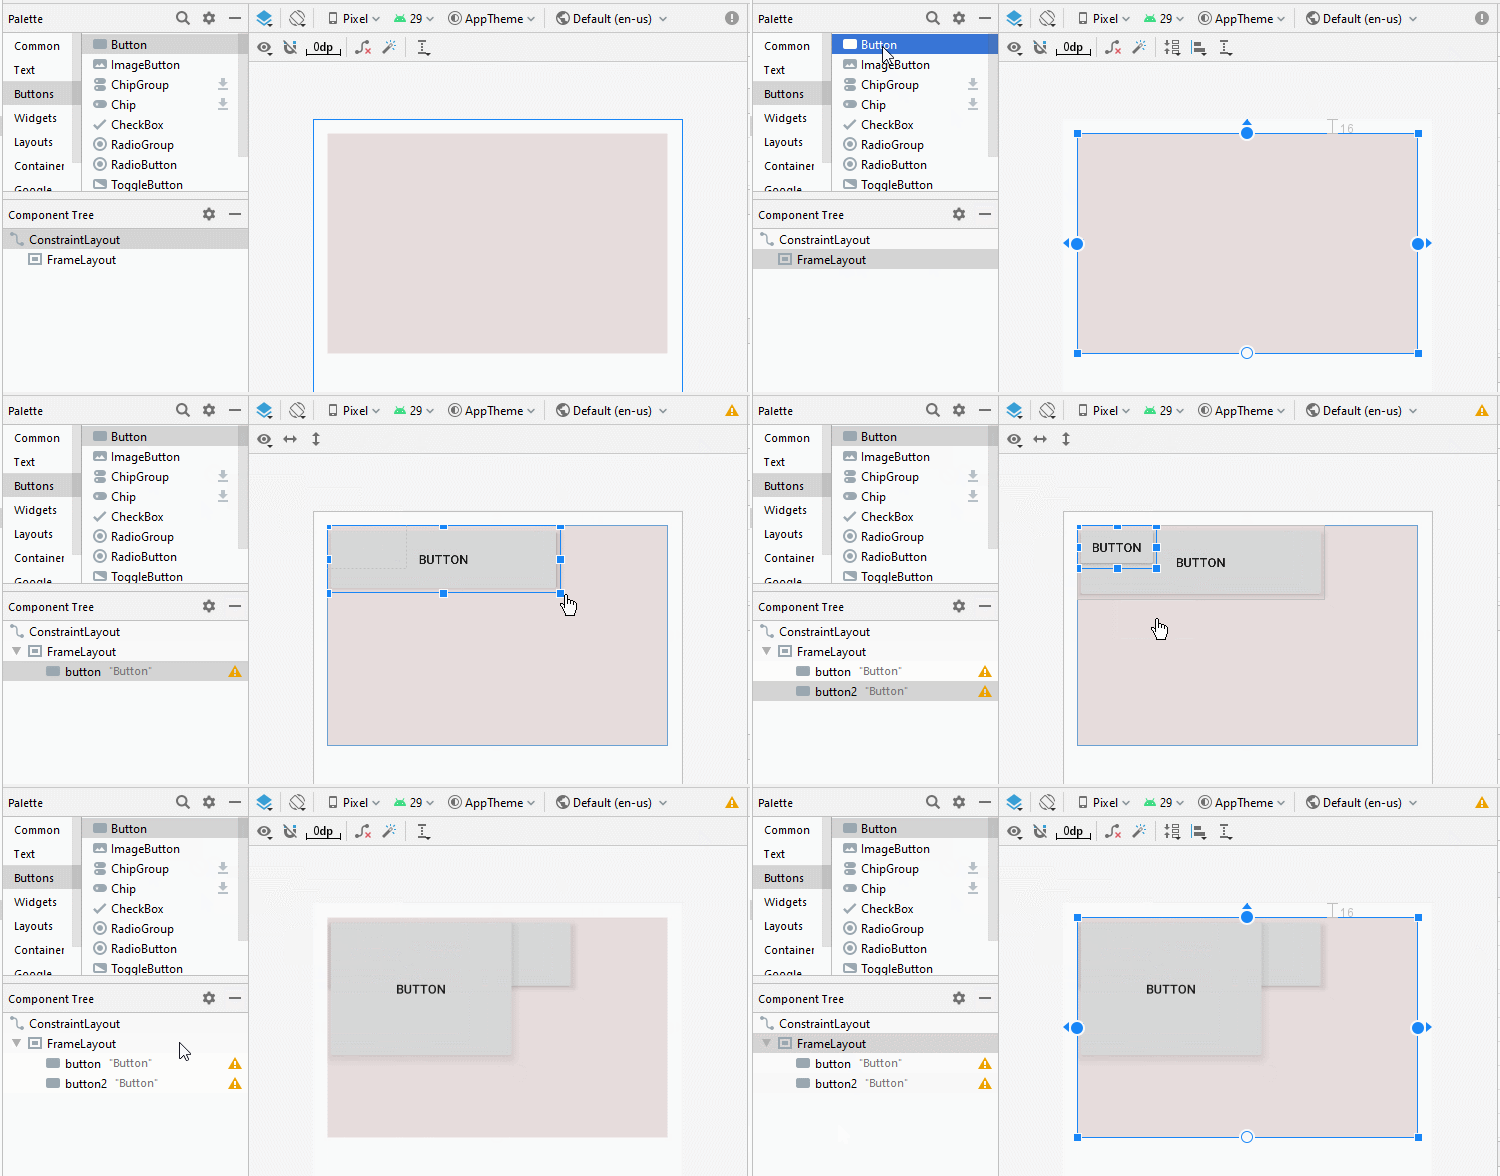
Sử dụng trong các trường hợp xây dựng bố cục tổ chức hiển thị một đối tượng duy nhất. Đối tượng mặc định vị trí top-left trên FrameLayout, View khai báo sau sẽ chồng nên View khai báo trước, có thể sử dụng thuộc tính Gravity để thiết lập lại vị trí.
<?xml version="1.0" encoding="utf-8"?>
<FrameLayout xmlns:android="http://schemas.android.com/apk/res/android"
    xmlns:app="http://schemas.android.com/apk/res-auto"
    xmlns:tools="http://schemas.android.com/tools"
    android:id="@+id/coordinatorLayout"
    android:layout_width="match_parent"
    android:layout_height="match_parent"
    tools:context=".MainActivity">

    <ImageView
        android:layout_width="wrap_content"
        android:layout_height="wrap_content"
        android:id="@id/Image1"
        ></ImageView>
    <ImageView
        android:layout_width="wrap_content"
        android:layout_height="wrap_content"
        android:id="@id/Image2"
        ></ImageView>
</FrameLayout>
Linear Layout
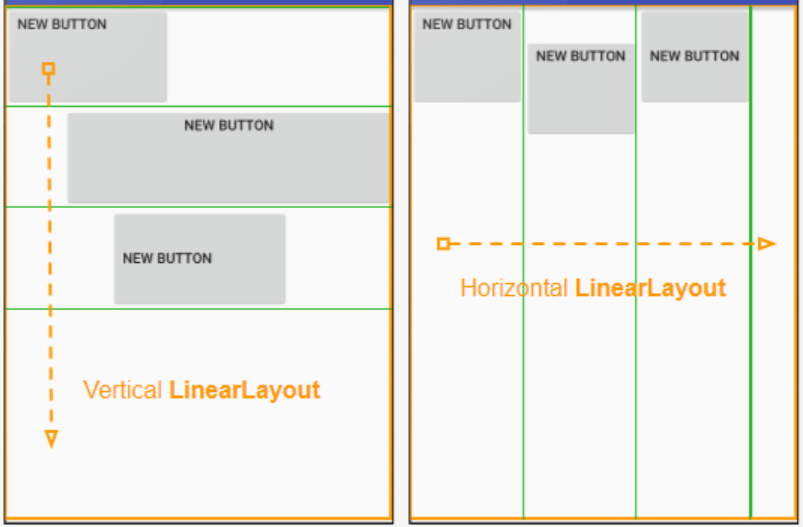
Sử dụng trong các trường hợp xây dựng bố cục tổ chức hiển thị các đối tượng theo một chiều duy nhất. (chiều dọc-vertical hoặc ngang-horizontal).
Đối tượng mặc định vị trí top-left trên LinearLayout, có thể sử dụng thuộc tính Gravity để thiết lập lại vị trí.
<?xml version="1.0" encoding="utf-8"?>
<LinearLayout xmlns:android="http://schemas.android.com/apk/res/android"
    xmlns:app="http://schemas.android.com/apk/res-auto"
    xmlns:tools="http://schemas.android.com/tools"
    android:id="@+id/coordinatorLayout"
    android:layout_width="match_parent"
    android:layout_height="match_parent"
    tools:context=".MainActivity">
    <Button
        android:id="@+id/button"
        android:layout_width="139dp"
        android:layout_height="wrap_content"
        android:background="#cc3300"
        android:text="Welcome!" />
    <Button
        android:id="@+id/button2"
        android:layout_width="138dp"
        android:layout_height="wrap_content"
        android:background="#ff3333"
        android:text="Hello" />
    <Button
        android:id="@+id/button3"
        android:layout_width="match_parent"
        android:layout_height="wrap_content"
        android:background="#ff9999"
        android:text="Hi" />
</LinearLayout>
- Chiều dọc android:orientation=”vertical”.
- Chiều ngang android:orientation =”horizontal”.
Relative Layout
RelativeLayout cho phép sắp xếp theo vị trí tương đối giữa các View khác trên giao diện(kể cả View chứa nó). Thường nó dựa vào Id của các View khác để sắp xếp theo vị trí tương đối. Do đó, khi dùng RelativeLayout ta phải chú ý là đặt Id của View cho chuẩn xác. Nếu sau khi Layout xong mà ta lại đổi Id của các View thì giao diện sẽ bị xáo trộn.
<?xml version="1.0" encoding="utf-8"?>
<RelativeLayout xmlns:android="http://schemas.android.com/apk/res/android"
    xmlns:app="http://schemas.android.com/apk/res-auto"
    xmlns:tools="http://schemas.android.com/tools"
    android:id="@+id/coordinatorLayout"
    android:layout_width="fill_parent"
    android:layout_height="wrap_content"
    android:background="#66cc33"
    android:padding="10px"
    tools:context=".MainActivity">
    <TextView android:id="@+id/a"
        android:layout_width="fill_parent"
        android:layout_height="wrap_content"
        android:background="#eeeeee"
        android:text="Type here"/>
    <EditText android:id="@+id/entry"
        android:layout_width="fill_parent"
        android:layout_height="wrap_content"
        android:layout_below="@+id/a"/>
    <Button android:id="@+id/OK"
        android:layout_width="wrap_content"
        android:layout_height="wrap_content"
        android:layout_below="@+id/entry"
        android:layout_alignParentRight="true"
        android:layout_marginLeft="10px"
        android:text="OK"/>
    <Button android:id="@+id/Cancel"
    android:layout_width="wrap_content"
    android:layout_height="wrap_content"
    android:layout_below="@+id/entry"
    android:layout_toLeftOf="@+id/OK"
    android:layout_alignTop="@+id/OK"
    android:text="Cancel"/>
</RelativeLayout>
 Table Layout
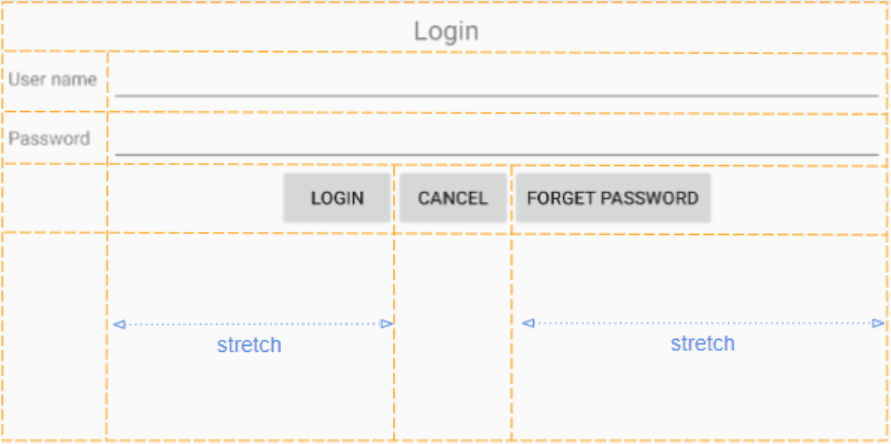
TableLayout kế thừa từ LinearLayout, cho phép hiển thị các đối tượng theo nhiều dòng (TableRow). Mỗi dòng có thể chừa nhiều View, mỗi View được xem là một cột. Đặc biệt, TableLayout lấy dòng có số lượng View nhiều nhất làm số cột, tức là nếu TableLayout có 3 dòng: dòng đầu tiên có 2 View, dòng thứ hai có 5 View, dòng thứ 3 có 4 View thì cột được xác định cho TableLayout này là số 5.
    <TableLayout
    android:layout_width="match_parent"
    android:layout_height="match_parent"
    <TableRow>
        <Button/>
    </TableRow>
TableLayout cho phép ta Meger(trộn) các ô trong TableRow bằng cách thiết lập thuộc tính “layout_span” cho View trong TableRow:
    <TableRow>
        <TextView android:text="Url:"/>
        <EditText android:id="@+id/entry"
                  android:layout_span="3"/>
    </TableRow>
Hay “layout_column” để di chuyển vị trí của View tới một cột nao đó trong TableRow. Dùng “stretchColumns”.
<TableLayout
    android:stretchColumns="*"
    android:layout_width="match_parent"
    android:layout_height="match_parent">
Ý nghĩa của hàm findViewById
Khi lập trình Android, để tương tác với các View trong giao diện chúng ta thường thông qua thuộc tính Id của các View để truy suất thay đổi dữ liệu. Vì Android chia màn hình (Activity) thành hai phần: Phần thiết kế giao diện, phần xử lý nghiệp vụ. Do đó, để truy suất được tới các View trong phần giao diện Android cung cấp hàm findViewById.
Phần giao diện:
<Button
android:id="@+id/OK"
android:layout_width="wrap_content"
android:layout_height="wrap_content"
android:text="@string/my_button_text" />
Phần xử lý nghiệp vụ:
Button OK = (Button)findViewById(R.id.OK)
Ta chú ý mỗi lần đặt Id cho bất kỳ một View nào đó thì Id này sẽ tự động được phát sinh ra trong lớp R của Android. Vì vậy, khi truy suất tới View ta dùng R.id.idView.


